![사이드 프로젝트 [국비의 모든것] - 프로젝트 환경설정](https://img1.daumcdn.net/thumb/R750x0/?scode=mtistory2&fname=https%3A%2F%2Fblog.kakaocdn.net%2Fdn%2F4Yp1p%2FbtsgttT8jlC%2F9LiKnr0GJhepOSh8R60MeK%2Fimg.png)

목차
프로젝트 생성
먼저 https://start.spring.io/ 에서 마이그레이션 할 프로젝트를 새로 생성한 뒤, 필요한 소스코드 파일들은 기존 프로젝트에서 복붙으로 옮기고자 합니다.
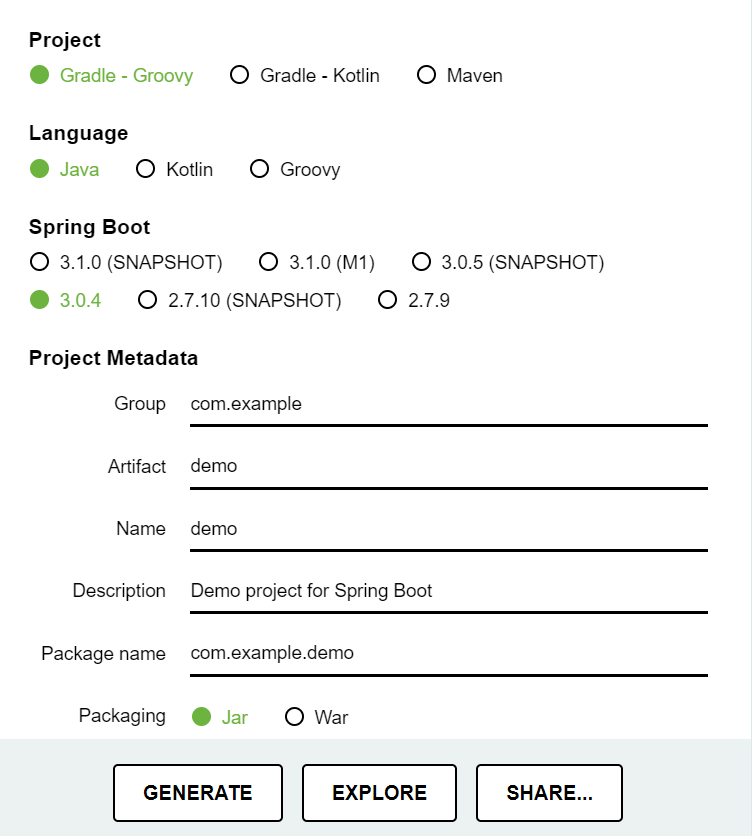
프로젝트에 기본 의존성은 Spring Web, Lombok, Spring Data JPA을 추가해주었고, Generated를 눌러 적당한 위치에 옮겨 압축을 풀었습니다. 저의 경우에 설정은
Gradle - Groovy 선택
Language - Java
Spring Boot - 2.7.8버전 선택
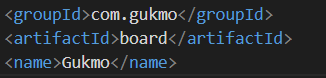
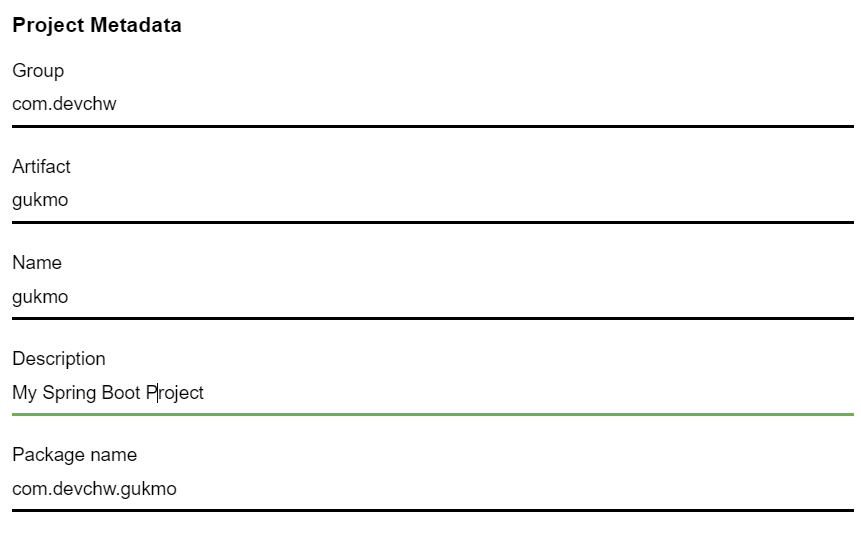
그다음 Project Metadata에 Group, Artifact, Name, Description, Package name을 설정해야 하는데, 솔직히 기존 프로젝트에서 해당 속성을 설정할 땐 잘 모르고 했었습니다.
각각 속성에 대하여 알아보고 기존 프로젝트 설정을 보니 잘못 설정했었음을 깨달았고, 변경하였습니다.
Gradle로 변환하기
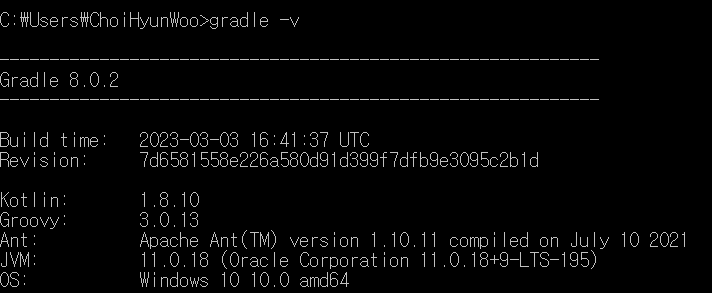
일단 기존의 의존성을 유지하고 maven에서 gradle로 변환하려면 gradle을 다운받아야 합니다. gradle 다운로드 과정은 다음과 같습니다.
gradle 공식 홈페이지에 가서 gradle을 다운받고, 원하는 폴더에 압축을 풉니다. gradle 환경변수 설정을 합니다.
cmd를 키고 gradle -v를 해서 제대로 나오면 성공.
gradle 설치가 완료되었으면 pom.xml에서 build.gradle로 변환해야 합니다.
cmd창에서 maven 프로젝트의 pom.xml이 있는 폴더에 이동한 뒤, gradle -init 명령어를 입력하면 pom.xml이 build.gradle로 변환되어 파일이 생성됩니다.
저는 이 build.gradle 파일에서 불필요한 의존성을 제외하고 필요한 의존성들만 골라서 새롭게 생성한 프로젝트의 build.gradle 파일에 옮겼습니다.
변환하여 옮긴 build.gradle
plugins {
	id 'java'
	id 'org.springframework.boot' version '2.7.8'
	id 'io.spring.dependency-management' version '1.1.0'
}

group = 'com.devchw'
version = '0.0.1-SNAPSHOT'
sourceCompatibility = '11'

configurations {
	compileOnly {
		extendsFrom annotationProcessor
	}
}

repositories {
	mavenLocal()
	maven {
		url = uri('https://repo.osgeo.org/repository/release/')
	}

	maven {
		url = uri('https://repo.maven.apache.org/maven2/')
	}
}

dependencies {
	// 기본 설정
	implementation 'org.springframework.boot:spring-boot-starter-data-jpa'
	implementation 'org.springframework.boot:spring-boot-starter-web'
	implementation 'org.springframework.boot:spring-boot-devtools'
	implementation 'org.springframework.boot:spring-boot-starter-aop'

	// JPA 파라미터 확인
	implementation 'com.github.gavlyukovskiy:p6spy-spring-boot-starter:1.5.6'

	// tiles 관련 의존성 추가
	implementation 'org.apache.tiles:tiles-core:3.0.7'
	implementation 'org.apache.tiles:tiles-api:3.0.7'
	implementation 'org.apache.tiles:tiles-servlet:3.0.7'
	implementation 'org.apache.tiles:tiles-jsp:3.0.7'
	implementation 'org.apache.tiles:tiles-el:3.0.5'

	implementation 'commons-fileupload:commons-fileupload:1.4' // 파일 업로드

	// 메일관련
	implementation 'com.sun.mail:javax.mail:1.6.2'
	implementation 'javax.activation:activation:1.1.1'

	// AES-256을 사용하여 양방향 암호화/복호화 하기 위한 라이브러리
	implementation 'commons-codec:commons-codec:1.15'

	//네이버 스마트 에디터에서 사진첨부 관련하여 이미지의 크기를 구하기위한 라이브러리
	implementation 'javax.media:jai_core:1.1.3'
	implementation 'javax.media:jai_codec:1.1.3'

	//Google reCAPTCHA
	implementation 'net.tanesha.recaptcha4j:recaptcha4j:0.0.7'
	implementation 'javax.json:javax.json-api:1.1.2'
	implementation 'org.glassfish:javax.json:1.1'

	//네이버로그인
	implementation 'com.github.scribejava:scribejava-core:2.8.1'

	//JSP
	implementation 'javax.servlet:jstl:1.2'
	implementation "org.apache.tomcat.embed:tomcat-embed-jasper"

	implementation 'org.apache.poi:poi-ooxml-schemas:4.1.1'
	implementation 'org.apache.poi:poi-ooxml:4.1.1'
	implementation 'org.apache.poi:poi:4.1.1'

	testImplementation 'junit:junit:4.13.1'
	compileOnly 'org.projectlombok:lombok'
	runtimeOnly 'com.h2database:h2'
	annotationProcessor 'org.projectlombok:lombok'
	testImplementation 'org.springframework.boot:spring-boot-starter-test'
}

tasks.named('test') {
	useJUnitPlatform()
}
Tiles 설정하기
기존 프로젝트에서 레이아웃 템플릿으로 Tiles를 사용하였습니다. Tiles를 사용하기 위해서 Build.gradle에 다음과 같은 의존성을 추가해주었습니다.
// tiles 관련 의존성 추가
implementation 'org.apache.tiles:tiles-core:3.0.7'
implementation 'org.apache.tiles:tiles-api:3.0.7'
implementation 'org.apache.tiles:tiles-servlet:3.0.7'
implementation 'org.apache.tiles:tiles-jsp:3.0.7'
implementation 'org.apache.tiles:tiles-el:3.0.5'
이후 프로젝트에 config 패키지를 생성하고, TilesConfig 클래스를 생성한 뒤 Tiles 설정 코드들을 넣어주었습니다.
package com.devchw.gukmo.config;

import org.springframework.context.annotation.Bean;
import org.springframework.context.annotation.Configuration;
import org.springframework.web.servlet.view.tiles3.TilesConfigurer;
import org.springframework.web.servlet.view.tiles3.TilesView;
import org.springframework.web.servlet.view.tiles3.TilesViewResolver;

@Configuration
public class TilesConfig {
    @Bean
    public TilesConfigurer tilesConfigurer() {
        final TilesConfigurer configurer = new TilesConfigurer();
        configurer.setDefinitions(new String[] {
                "/WEB-INF/tiles/tiles-layout.xml"
        });
        configurer.setCheckRefresh(true);
        return configurer;
    }

    @Bean
    public TilesViewResolver tilesViewResolver() {
        final TilesViewResolver tilesViewResolver = new TilesViewResolver();
        tilesViewResolver.setViewClass(TilesView.class);
        tilesViewResolver.setOrder(1);
        return tilesViewResolver;
    }
}
다음으로 기존 Tiles 레이아웃을 설정한 파일을 기존 프로젝트에서 갖고온 뒤 넣어주려고 하는데 webapp 폴더가 없었습니다. 찾아보니 Spring Boot는 기본적으로 JSP를 권장하지 않기 때문에 webapp 폴더가 없다고 합니다. 그래서 webapp 폴더를 직접 만들고 기존프로젝트의 tiles 설정 파일들을 넣어주었습니다.
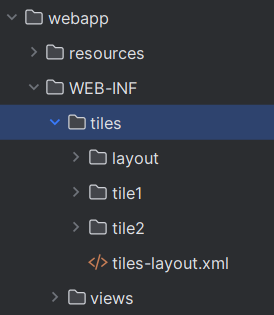
css,js 파일과 여러 view 라이브러리들을 넣을 resources 폴더도 생성한 뒤, 기존 프로젝트의 resources폴더 파일들을 전부 넣어주었습니다. 기존 프로젝트에서 이 부분도 팀원들의 이름별로 나누어져 있었고, View에 대한 리팩토링은 최소로 한다고 하였지만 마음에 들지 않아서 차차 개발을 진행하며 이 부분도 고치려고 합니다.
tiles 설정이 잘 되었나 보기 위하여 index.jsp를 생성한 뒤 스프링부트를 실행하고 header.jsp와 footer.jsp가 잘 병합되어 나오는지 확인해보았습니다.
index.jsp
<%@ page language="java" contentType="text/html; charset=UTF-8"
	pageEncoding="UTF-8"%>

<div>스프링 부트 + JPA로 실행시키고 tiles 설정까지 성공 !</div>
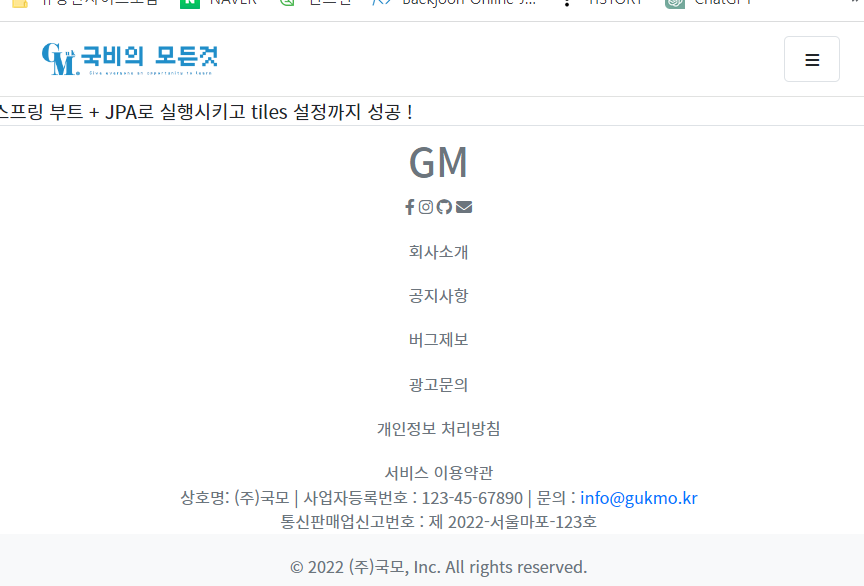
이제 데이터베이스를 연결한 뒤, 개발을 진행해보도록 하겠습니다.
※ 모든 소스코드는 https://github.com/DevCHW/gukmo-code-refactor 에서 확인할 수 있습니다.
'개발 기록' 카테고리의 다른 글
| 사이드 프로젝트 [국비의 모든것] - 로그인, 로그아웃 기능 구현 (0) | 2023.06.05 |
|---|---|
| 사이드 프로젝트 [국비의 모든것] - 패키지 구조 설계하기 (0) | 2023.06.05 |
| 사이드 프로젝트 [국비의 모든것] - 데이터베이스, 엔티티 설계 (0) | 2023.06.05 |
| 사이드 프로젝트 [국비의 모든것] - Spring Boot Oracle DB 연결 (0) | 2023.06.05 |
| 사이드 프로젝트 [국비의 모든것] - 프로젝트 진행 이유 (0) | 2023.05.19 |
개발을 하며 만났던 문제들과 해결 과정, 공부한 내용 등을 기록합니다.
포스팅이 좋았다면 "좋아요❤️" 또는 "구독👍🏻" 해주세요!
![사이드 프로젝트 [국비의 모든것] - 패키지 구조 설계하기](https://img1.daumcdn.net/thumb/R750x0/?scode=mtistory2&fname=https%3A%2F%2Fblog.kakaocdn.net%2Fdn%2FpTedi%2FbtsiO6Po5M2%2FGuR40bkhMOTYJwOaT5yGu1%2Fimg.png)
![사이드 프로젝트 [국비의 모든것] - 데이터베이스, 엔티티 설계](https://img1.daumcdn.net/thumb/R750x0/?scode=mtistory2&fname=https%3A%2F%2Fblog.kakaocdn.net%2Fdn%2FbIAcPT%2FbtsiuMKGM9H%2FPzuYdl1vSro7RmDgfetqt1%2Fimg.png)
![사이드 프로젝트 [국비의 모든것] - Spring Boot Oracle DB 연결](https://img1.daumcdn.net/thumb/R750x0/?scode=mtistory2&fname=https%3A%2F%2Fblog.kakaocdn.net%2Fdn%2FbD4yj6%2FbtsivgSfMPy%2FoBtusk4vn1VlpaMsrALQ6K%2Fimg.png)
